Changelog
Total Products – 20704

User registration | Google Sheets

star star star star star_half 4.5/5 based on 100 reviews
schedule

Updated on: December 9, 2024

code

Version 1.0.2

User registration | Google Sheets
GPL License
VirusTotal Scan: View Report
Updated On: December 9, 2024
Version: 1.0.2
Downloads: 12
Status: verified_user Secure & Clean
Have a problem? bug_report Report Click here to report any issues with the product.

Single Purchase

Buy this product once and own it forever.

$ 3.49

Membership

Unlock everything on the site for one low price.

$ 16 / month SAVE 90%

Product Overview

About User registration | Google Sheets

Introduction

Looking to create a user registration form using Google Sheets? You've come to the right place. This blog will guide you through the process of setting up a user registration system that stores data in Google Sheets. User registration forms are crucial for websites and applications as they allow businesses to collect valuable information about their users.

Setting up Google Sheets

The first step in creating a user registration system using Google Sheets is to set up a new Google Sheets document. You can do this by logging into your Google account and opening Google Sheets. Create a new spreadsheet and set up the columns that you want to include in your user registration form. Common columns include: name, email, phone number, address, etc.

Creating the User Registration Form

Once you have set up your Google Sheets document, you can start creating the user registration form. There are several ways to do this, including using Google Forms or embedding a form directly into your website. Google Forms is a great tool for creating simple forms quickly and easily. You can add the form fields you need and customize the design to match your branding.

Linking the Form to Google Sheets

After creating the user registration form, you will need to link it to your Google Sheets document. This will ensure that when a user submits their information through the form, it is automatically added to your spreadsheet. To do this, go to the responses tab in Google Forms and select the option to create a new spreadsheet. This will create a new sheet in your Google Sheets document that will store all form responses.

Managing User Data

With your user registration form set up and linked to Google Sheets, you can now start collecting user data. It is important to regularly check your Google Sheets document to ensure that all submissions are being recorded accurately. You can use filters and sorting functions in Google Sheets to manage and analyze the data more effectively.

Securing User Data

It is essential to take precautions to secure the user data collected through your registration form. Ensure that only authorized personnel have access to the Google Sheets document and consider encrypting sensitive information. Additionally, you may want to regularly back up your Google Sheets document to prevent data loss.

Conclusion

Setting up a user registration system using Google Sheets is a simple and cost-effective way to collect and manage user data. By following the steps outlined in this blog, you can create a user registration form that seamlessly integrates with Google Sheets, allowing you to efficiently collect, store, and analyze user information. Remember to regularly review and update your user registration form to ensure it meets the evolving needs of your business.

Installation & Usage Guide

What You'll Need

  • After downloading from our website, first unzip the file. Inside, you may find extra items like templates or documentation. Make sure to use the correct plugin/theme file when installing.
1

Unzip the Plugin File

Find the plugin's .zip file on your computer. Right-click and extract its contents to a new folder.

Image showing how to unzip a file
2

Upload the Plugin Folder

Navigate to the wp-content/plugins folder on your website's side. Then, drag and drop the unzipped plugin folder from your computer into this directory.
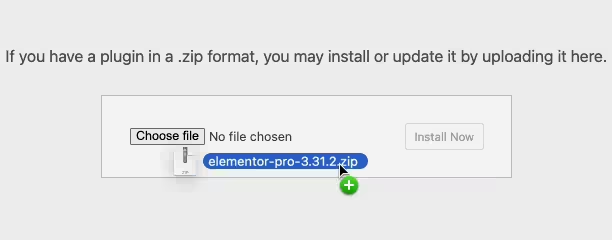
Image of dragging and dropping the plugin folder
3

Activate the Plugin

Finally, log in to your WordPress dashboard. Go to the Plugins menu. You should see your new plugin listed. Click Activate to finish the installation.
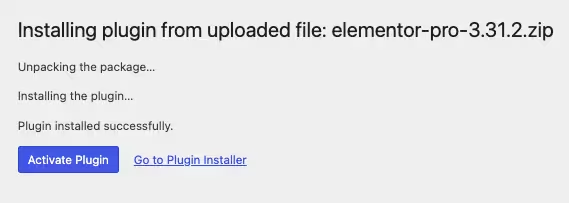
Image of the WordPress plugins page with the activate button highlighted

PureGPL ensures you have all the tools and support you need for seamless installations and updates!

For any installation or technical-related queries, Please contact via Live Chat or Support Ticket.