Changelog
Total Products – 20704

Peepso | Groups

star star star star star_half 4.5/5 based on 100 reviews
schedule

Updated on: September 5, 2025

code

Version 7.0.6.1

Peepso | Groups
GPL License
VirusTotal Scan: View Report
Updated On: September 5, 2025
Version: 7.0.6.1
Downloads: 12
Status: verified_user Secure & Clean
Have a problem? bug_report Report Click here to report any issues with the product.

Single Purchase

Buy this product once and own it forever.

199

Membership

Unlock everything on the site for one low price.

912 / month SAVE 90%

Product Overview

About Peepso | Groups

Introduction to Peepso

Peepso is a powerful social networking plugin for WordPress that allows you to build and manage your own online community. With Peepso, you can easily create a social network where users can interact, create profiles, share updates, and more. One of the key features of Peepso is the ability to create and manage groups.

What are Groups?

Groups in Peepso are a way for users with common interests to come together and engage in discussions, share content, and collaborate. A group can be created around any topic or theme, whether it's a hobby, a professional interest, or a local community. Users can join multiple groups and interact with other members by posting updates, commenting, and liking content.

Creating a Group

To create a group in Peepso, simply go to the "Groups" section in your Peepso admin dashboard and click on the "New Group" button. You will then be prompted to enter the group name, description, and choose the group's privacy settings. You can also customize the group's avatar and cover image to give it a unique look and feel. Once the group is created, you can invite members to join or allow users to request to join.

Managing Group Settings

Peepso offers a range of settings to help you customize and manage your groups. You can choose whether a group is public, private, or hidden, controlling who can view and join the group. Additionally, you can set group-specific permissions, such as allowing only admins to post or enabling member moderation. You can also configure notifications, member roles, and privacy settings to ensure a safe and engaging group environment.

Group Features and Engagement

Peepso groups come with a variety of features to enhance engagement and collaboration. Members can create posts, share photos and videos, and comment on each other's content. Groups also have their own activity stream, allowing members to stay up-to-date with the latest updates and discussions. Group admins have additional abilities, such as moderating content, managing members, and customizing group layouts.

Benefits of Using Groups in Peepso

Using groups in Peepso offers numerous benefits for your online community. Groups provide a focused space for users with similar interests to connect and interact, fostering a sense of belonging and camaraderie. They also encourage active participation and increase user engagement. From a management perspective, groups allow you to organize discussions and content based on specific topics, making it easier for users to find relevant information.

Conclusion

Peepso's groups feature is a powerful tool for building a thriving online community. Whether you want to create a space for hobbyists, professionals, or local communities, groups in Peepso offer an effective way to bring people together and foster engagement. With easy-to-use features and customizable settings, Peepso makes it simple to create and manage groups that will help your community thrive.

Installation & Usage Guide

What You'll Need

  • After downloading from our website, first unzip the file. Inside, you may find extra items like templates or documentation. Make sure to use the correct plugin/theme file when installing.
1

Unzip the Plugin File

Find the plugin's .zip file on your computer. Right-click and extract its contents to a new folder.

Image showing how to unzip a file
2

Upload the Plugin Folder

Navigate to the wp-content/plugins folder on your website's side. Then, drag and drop the unzipped plugin folder from your computer into this directory.
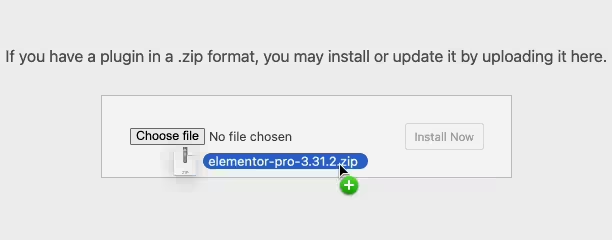
Image of dragging and dropping the plugin folder
3

Activate the Plugin

Finally, log in to your WordPress dashboard. Go to the Plugins menu. You should see your new plugin listed. Click Activate to finish the installation.
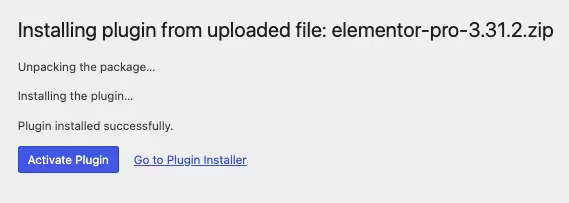
Image of the WordPress plugins page with the activate button highlighted

PureGPL ensures you have all the tools and support you need for seamless installations and updates!

For any installation or technical-related queries, Please contact via Live Chat or Support Ticket.