Changelog
Total Products – 20704

Paid memberships pro | Import Users from CSV

star star star star star_half 4.5/5 based on 100 reviews
schedule

Updated on: March 30, 2024

code

Version 1.1.1

Paid memberships pro | Import Users from CSV
GPL License
VirusTotal Scan: View Report
Updated On: March 30, 2024
Version: 1.1.1
Downloads: 12
Status: verified_user Secure & Clean
Have a problem? bug_report Report Click here to report any issues with the product.

Single Purchase

Buy this product once and own it forever.

$ 3.49

Membership

Unlock everything on the site for one low price.

$ 16 / month SAVE 90%

Product Overview

About Paid memberships pro | Import Users from CSV

Paid Memberships Pro Overview

Paid Memberships Pro is a powerful plugin that allows website owners to create and manage membership levels, subscription plans, and restricted content areas. It enables you to monetize your site by offering exclusive content to members who pay for access. The Import Users from CSV feature makes it easier to onboard new members in bulk.

Benefits of Importing Users from CSV

Importing users from a CSV file can save you time and effort, especially when you need to add a large number of users to your membership site. It eliminates the need to manually enter each user's information, making the onboarding process more efficient. This feature is particularly useful when you are migrating user data from another platform or integrating with a third-party system.

How to Import Users from CSV using Paid Memberships Pro

1. Prepare Your CSV File: Make sure your CSV file is properly formatted with the required user information, such as username, email address, and membership level. You can use a spreadsheet program like Excel or Google Sheets to create and save your CSV file.

2. Access the Import Users Tool: In your Paid Memberships Pro dashboard, navigate to the Memberships tab and select the Import Users option. Upload your CSV file using the provided tool.

3. Map CSV Fields: Match the fields in your CSV file to the corresponding user fields in Paid Memberships Pro. This step ensures that the user data is imported correctly, including membership levels, expiration dates, and custom user meta.

4. Initiate the Import Process: Once you have mapped the CSV fields, review the import settings and initiate the import process. Paid Memberships Pro will process the CSV file and create new user accounts based on the imported data.

5. Verify Imported Users: After the import process is complete, double-check the newly created user accounts to ensure that all information is accurate. You can also send welcome emails or notifications to the imported users to confirm their account activation.

Tips for Successful User Import

- Ensure that your CSV file follows the correct format and includes all necessary user information.

- Regularly back up your user data before initiating any import process to prevent data loss.

- Test the import feature with a small sample CSV file before importing a large dataset to identify and resolve any issues proactively.

- Keep track of the import progress and monitor for any errors or inconsistencies in the imported user data.

- Communicate with your members about any upcoming changes or updates related to the user import process to maintain transparency and avoid confusion.

Conclusion

Importing users from a CSV file with Paid Memberships Pro can streamline the process of adding new members to your site and managing user data efficiently. By following the steps outlined above and implementing best practices for user import, you can enhance the user experience and optimize the membership management process on your website.

Installation & Usage Guide

What You'll Need

  • After downloading from our website, first unzip the file. Inside, you may find extra items like templates or documentation. Make sure to use the correct plugin/theme file when installing.
1

Unzip the Plugin File

Find the plugin's .zip file on your computer. Right-click and extract its contents to a new folder.

Image showing how to unzip a file
2

Upload the Plugin Folder

Navigate to the wp-content/plugins folder on your website's side. Then, drag and drop the unzipped plugin folder from your computer into this directory.
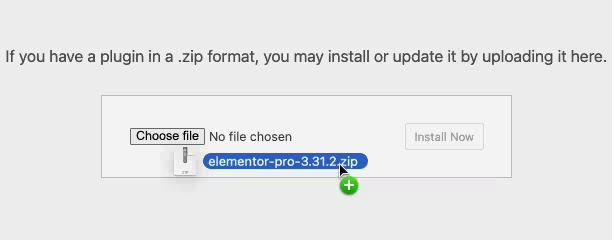
Image of dragging and dropping the plugin folder
3

Activate the Plugin

Finally, log in to your WordPress dashboard. Go to the Plugins menu. You should see your new plugin listed. Click Activate to finish the installation.
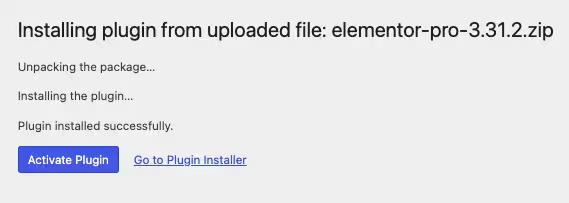
Image of the WordPress plugins page with the activate button highlighted

PureGPL ensures you have all the tools and support you need for seamless installations and updates!

For any installation or technical-related queries, Please contact via Live Chat or Support Ticket.