Changelog
Total Products – 20704

Beehive Pro – Analytics Dashboard in your WordPress

star star star star star_half 4.5/5 based on 100 reviews
schedule

Updated on: September 4, 2025

code

Version 3.4.18

Beehive Pro – Analytics Dashboard in your WordPress
GPL License
VirusTotal Scan: View Report
Updated On: September 4, 2025
Version: 3.4.18
Downloads: 12
Status: verified_user Secure & Clean
Have a problem? bug_report Report Click here to report any issues with the product.

Single Purchase

Buy this product once and own it forever.

$ 3.49

Membership

Unlock everything on the site for one low price.

$ 16 / month SAVE 90%

Product Overview

About Beehive Pro – Analytics Dashboard in your WordPress

Maintaining a successful online presence requires timely and accurate data analysis. Beehive Pro offers a user-friendly analytics dashboard right within your WordPress site, allowing you to efficiently monitor and optimize your website's performance. With advanced tools and features, Beehive Pro empowers you to make informed decisions, drive engagement, and boost conversions. Let's take a closer look at what makes Beehive Pro the ultimate analytics solution for WordPress users.

Real-Time Data Tracking

Beehive Pro's analytics dashboard provides real-time data tracking, giving you instant insights into visitor behavior, traffic sources, popular content, and more. With up-to-the-minute statistics at your fingertips, you can quickly identify trends, monitor campaign performance, and respond to changes effectively.

Customizable Reports

Customizable reports in Beehive Pro allow you to tailor your analytics dashboard to suit your specific needs. Whether you're interested in overall website performance, social media metrics, or e-commerce data, you can create custom reports with the metrics that matter most to you. This flexibility ensures that you focus on the key performance indicators that drive your business forward.

User-Friendly Interface

Beehive Pro's intuitive interface makes it easy to navigate your analytics dashboard and access the information you need. The clean design and logical layout ensure that you can quickly find the data you're looking for, without any unnecessary clutter or confusion. Even if you're new to web analytics, Beehive Pro's user-friendly interface makes it simple to track and analyze your website's performance.

Advanced Analytics Features

From heatmaps and session recordings to conversion tracking and A/B testing, Beehive Pro offers a range of advanced analytics features to help you understand user behavior and optimize your website for success. These powerful tools provide valuable insights into how visitors interact with your site, allowing you to make data-driven decisions that improve user experience and drive conversions.

Security and Privacy

When it comes to analytics data, security and privacy are paramount. Beehive Pro ensures that your data is handled with the utmost care, with strict security measures in place to protect sensitive information. You can trust that your analytics data is safe and secure, giving you peace of mind as you track and analyze your website's performance.

In conclusion, Beehive Pro's analytics dashboard offers WordPress users a comprehensive solution for tracking, analyzing, and optimizing website performance. With its real-time data tracking, customizable reports, user-friendly interface, advanced features, and commitment to security and privacy, Beehive Pro is the go-to choice for WordPress users who want to take their analytics game to the next level.

Installation & Usage Guide

What You'll Need

  • After downloading from our website, first unzip the file. Inside, you may find extra items like templates or documentation. Make sure to use the correct plugin/theme file when installing.
1

Unzip the Plugin File

Find the plugin's .zip file on your computer. Right-click and extract its contents to a new folder.

Image showing how to unzip a file
2

Upload the Plugin Folder

Navigate to the wp-content/plugins folder on your website's side. Then, drag and drop the unzipped plugin folder from your computer into this directory.
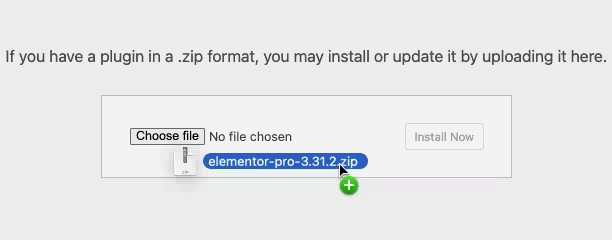
Image of dragging and dropping the plugin folder
3

Activate the Plugin

Finally, log in to your WordPress dashboard. Go to the Plugins menu. You should see your new plugin listed. Click Activate to finish the installation.
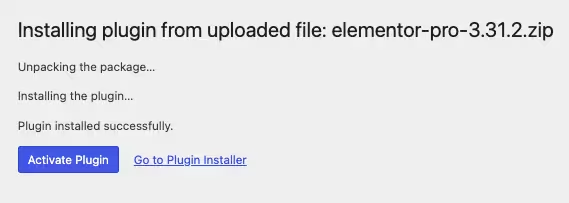
Image of the WordPress plugins page with the activate button highlighted

PureGPL ensures you have all the tools and support you need for seamless installations and updates!

For any installation or technical-related queries, Please contact via Live Chat or Support Ticket.