Changelog
Total Products – 20704

Awesome support | Smart Agent Assignment

star star star star star_half 4.5/5 based on 100 reviews
schedule

Updated on: March 18, 2024

code

Version 2.4.2

Awesome support | Smart Agent Assignment
GPL License
VirusTotal Scan: View Report
Updated On: March 18, 2024
Version: 2.4.2
Downloads: 12
Status: verified_user Secure & Clean
Have a problem? bug_report Report Click here to report any issues with the product.

Single Purchase

Buy this product once and own it forever.

$ 3.49

Membership

Unlock everything on the site for one low price.

$ 16 / month SAVE 90%

Product Overview

About Awesome support | Smart Agent Assignment

Introduction

Are you looking for a reliable and efficient way to assign agents to customer support tickets? Look no further than Awesome Support's Smart Agent Assignment feature. This powerful tool streamlines the process of matching customer inquiries with the best-suited support agent, ensuring a seamless and personalized experience for your customers.

Benefits of Smart Agent Assignment

One of the key benefits of Smart Agent Assignment is its ability to optimize agent productivity. By automatically assigning tickets to agents based on their skillset, availability, and workload, the system ensures that each ticket is handled by the most qualified agent. This not only improves the speed and accuracy of responses but also enhances customer satisfaction.

Additionally, Smart Agent Assignment helps to evenly distribute the workload among agents, preventing bottlenecks and ensuring that no ticket is left unattended. This leads to a more efficient and organized customer support process, ultimately benefiting both your team and your customers.

Customization and Flexibility

Another advantage of Awesome Support's Smart Agent Assignment feature is its high level of customization and flexibility. You have the ability to set up rules and criteria for agent assignment, such as prioritizing certain agents for specific types of tickets or automatically assigning tickets based on language preferences.

Furthermore, the system allows for easy adjustments and tweaks to the assignment algorithm, ensuring that it is always optimized for your team's specific needs and workflows. This customization capability ensures that you can fine-tune the system to best suit your team's dynamics and customer service goals.

Integration and Compatibility

Awesome Support's Smart Agent Assignment feature seamlessly integrates with popular help desk platforms and customer support tools, making it easy to implement into your existing workflows. Whether you use a standalone help desk system or a comprehensive customer relationship management (CRM) solution, the Smart Agent Assignment feature can easily be integrated to enhance your agent assignment process.

Additionally, the feature is compatible with various communication channels, including email, live chat, social media, and phone support. This ensures that no matter how your customers reach out for support, the Smart Agent Assignment feature can efficiently match them with the best-suited agent to provide assistance.

Conclusion

In conclusion, Awesome Support's Smart Agent Assignment feature is a powerful tool that can revolutionize your customer support process. By automating the agent assignment process and optimizing agent productivity, the feature helps to streamline your support workflows, enhance customer satisfaction, and improve overall efficiency. With its customization options, flexibility, and compatibility with popular help desk platforms, the Smart Agent Assignment feature is a valuable asset for any customer support team looking to provide top-notch service to their customers.

Installation & Usage Guide

What You'll Need

  • After downloading from our website, first unzip the file. Inside, you may find extra items like templates or documentation. Make sure to use the correct plugin/theme file when installing.
1

Unzip the Plugin File

Find the plugin's .zip file on your computer. Right-click and extract its contents to a new folder.

Image showing how to unzip a file
2

Upload the Plugin Folder

Navigate to the wp-content/plugins folder on your website's side. Then, drag and drop the unzipped plugin folder from your computer into this directory.
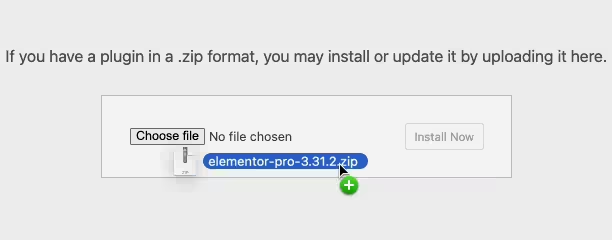
Image of dragging and dropping the plugin folder
3

Activate the Plugin

Finally, log in to your WordPress dashboard. Go to the Plugins menu. You should see your new plugin listed. Click Activate to finish the installation.
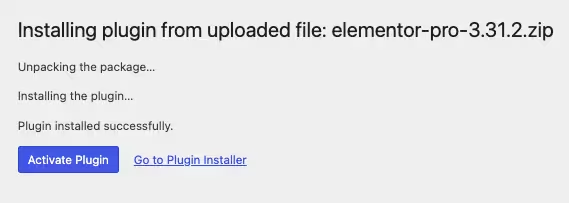
Image of the WordPress plugins page with the activate button highlighted

PureGPL ensures you have all the tools and support you need for seamless installations and updates!

For any installation or technical-related queries, Please contact via Live Chat or Support Ticket.