Changelog Total Products – 20704

Gravity forms | Geolocation

star star star star star_half 4.5/5 based on 100 reviews
schedule

Updated on: May 23, 2025

code

Version 1.5.0

Gravity forms | Geolocation
GPL License
VirusTotal Scan: View Report
Updated On: May 23, 2025
Version: 1.5.0
Downloads: 12
Status: verified_user Secure & Clean
Have a problem? bug_report Report Click here to report any issues with the product.

Single Purchase

Buy this product once and own it forever.

$ 3.49

Membership

Unlock everything on the site for one low price.

$ 16 / month SAVE 90%

Product Overview

About Gravity forms | Geolocation

Introduction

Gravity Forms is a popular WordPress form plugin that allows users to create complex forms with ease. One of the key features of Gravity Forms is its geolocation functionality, which enables users to collect and store location-based data from form submissions. In this blog post, we will explore the various ways in which Gravity Forms can be used to incorporate geolocation into your forms.

How does Geolocation work in Gravity Forms?

Geolocation in Gravity Forms is powered by the Google Maps API, which allows users to accurately determine the geographical location of form submissions. By enabling geolocation in their forms, users can collect location data such as latitude, longitude, address, and more. This data can then be used to provide location-based services or customize user experiences based on their geographical location.

Benefits of using Geolocation in Gravity Forms

There are several benefits to incorporating geolocation into your Gravity Forms:

  • Improved User Experience: Geolocation can be used to automatically detect a user's location and pre-fill form fields with relevant information, making the form submission process faster and more convenient.
  • Location-based Targeting: Geolocation data can be used to deliver personalized content or offers based on a user's location, improving engagement and conversion rates.
  • Enhanced Data Collection: Geolocation data provides valuable insights into the geographic distribution of your audience, allowing for more targeted marketing campaigns and strategic decision-making.

How to Enable Geolocation in Gravity Forms

Enabling geolocation in Gravity Forms is a straightforward process that involves adding a geolocation field to your form. To do this, simply drag and drop the geolocation field from the available field types and configure it to suit your needs. You can customize the field to collect specific location data or integrate it with other fields to create dynamic forms that adapt to users' locations.

Use Cases for Geolocation in Gravity Forms

There are numerous ways in which geolocation can be utilized in Gravity Forms:

  • Store Locator: Create a form that allows users to find the nearest store or location based on their current position.
  • Event Registration: Collect location data from event attendees to track the geographic distribution of participants.
  • Delivery Services: Use geolocation to determine the delivery address for orders placed through a form.

Conclusion

Geolocation is a powerful feature in Gravity Forms that can enhance the functionality and user experience of your forms. By enabling geolocation, you can collect valuable location-based data, provide personalized services, and optimize your marketing efforts. Whether you are looking to streamline form submissions or target specific geographic regions, geolocation in Gravity Forms offers a range of benefits for WordPress users.

Installation & Usage Guide

What You'll Need

  • After downloading from our website, first unzip the file. Inside, you may find extra items like templates or documentation. Make sure to use the correct plugin/theme file when installing.
1

Unzip the Plugin File

Find the plugin's .zip file on your computer. Right-click and extract its contents to a new folder.

Image showing how to unzip a file
2

Upload the Plugin Folder

Navigate to the wp-content/plugins folder on your website's side. Then, drag and drop the unzipped plugin folder from your computer into this directory.
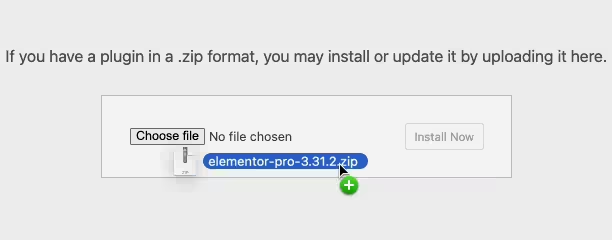
Image of dragging and dropping the plugin folder
3

Activate the Plugin

Finally, log in to your WordPress dashboard. Go to the Plugins menu. You should see your new plugin listed. Click Activate to finish the installation.
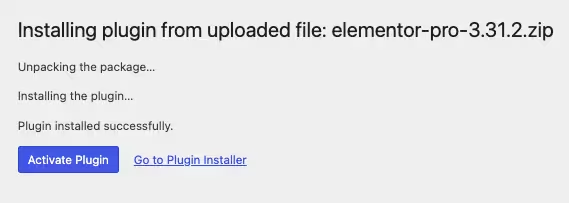
Image of the WordPress plugins page with the activate button highlighted

PureGPL ensures you have all the tools and support you need for seamless installations and updates!

For any installation or technical-related queries, Please contact via Live Chat or Support Ticket.